I like to challenge myself from time to time to try my hand at something I have never ever done before.
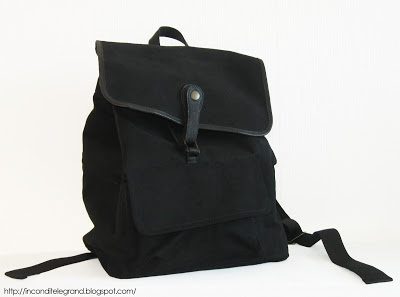
I made a dress, and I am not very strong at dressmaking. This week I made a bag, a back bag. And I swear on my sewing machine I have never ever before made one that actually came out okay. (There was this time in college when I sewed a bag. Embellishments on it looked much better than the bag itself)
I am sure you are all familiar with Bag’n-telle blog or if not you know Dean Morin’s Weekend Designer blog?
Anyways, Bag’n-telle is dedicated to bag making, from pattern drafting to techniques and tools, to bags anatomy, this blog has it all.
I found the Old School Backpack tutorial quite some time ago and bookmarked the page for future (read more like never ever). I probably would have never visited the site again if it wasn't for my friend Linnea.
See, I know she wanted a bag like that desperately (or maybe not). I am going to spend my vacation in Sweden visiting her and one must bring presents when they go... (thats what I was taught as a child - never go for a visit with empty hands) and so I decided to make her the Old School Backpack and challenge myself to make something I have never made before - a bag.
Tutorials on Bag’n-telle are very very detailed and thorough, which is very handy and helpful when you’ve never made a bag or have just started. Dean Morin goes through every step of said backpack making and even reminds you that your hardware should match!
I always thought that bag making was like climbing the Himalaya, but based on my recent experience - it is not that hard. It’s definitely trickier than making a circle skirt, but it won't kill you LOL!
I used heavier black cotton gabardine. I did not prewash the fabric in fear that the fabric may lose some of color and get a bit patchy.
The tutorial suggested to use fusible interfacing to reinforce some of the bag details. I reinforced the whole bag with vintage cotton shirting that my gran gave me, which I fixed to outer shell with fusible web. This gave some more body to the shell fabric and hopefully prevents it from stretching out.
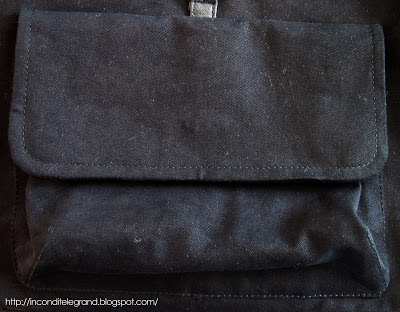
Front patch pocket is fully lined and as you can see I did not use leather binding on the flap. The tutorial suggest you use hook and loop fastener for the flap pocket, I went for a more modern option and used a magnetic snap.
I did not want to splurge on buying pig skin leather for the bag and decided to recycle an old leather jacket from the 80’ that cost me 50€ cents. The leather was very soft so I reinforced the clasp with two layers of shell fabric and used double sided tape to glue all the layers together. I cut the clasp pieces a bit bigger and trimmed the edges after it was assembled. I used black acrylic paint to conceal the edge and make it all look nicer.Tthe same technique was used on the grab handle.
I was terrified of using leather binding on the top flap, but fixing the binding with double sided tape before sewing made it almost easy. Sadly the strip I cut for the binding ended up being wee bit short for the flap so I had to continue the binding (also the already taped binding refused to come off from the flap)
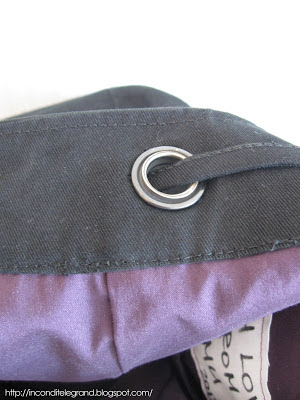
For the lining I used purple cotton shirting, that I hope is strong enough for the backpack. Bag lining has 5 slip pockets and one zipper pocket to keep all the tiny things in place and somewhat organized. For slip pockets I simply made a deep enough fold in the shirting before cutting the front and back pieces.
I also ended up sewing the straps since I couldn't find cotton webbing and Linnea likes softer straps better than hard. To make the straps “soft” I simply used some scrap wool wadding I had laying around the sewing room. I attached the buckles to the strap with nylon webbing I used for the lower part of the strap. Both ends of the straps are topstitched in the shape of an envelope to the bag, to make sure they last and won't give out when something heavier is put in the bag.
I added a wide binding/cuff to the top of the bag simply because I felt the bag needed a bit more depth and to make the lining attaching a bit easier (Dean suggest you stitch the lining to the bag by hand)
I think it took me about 14 work hours to make the backpack and the process of making it was very interesting and educational. I myself am very pleased with the finished product and am hoping Linnea will like it also, despite of non matchy zippers and hardware (yes, sadly the grommets I used are black not copper)
And I am definitely ready to sew another bag...someday...in the near future...maybe in next life LOL!
 |
| Linking up on |


Ahhhhhh so cool! *kisseskisseskisses*
ReplyDeleteNice job! I would like to make some bags in the future, maybe a hiking backpack. It is actually useful to make your own because you can customize the pockets for whatever you plan on doing with it. I think I will need a stronger sewing machine to try something like this though...
ReplyDeleteIs Maimu your actual first name, or a nickname?? I have never heard that name in America.
-Matt
Thanks! And you most definitely would need a stronger machine for a hiking backpack. And very heavy duty materials as well!
ReplyDeleteAND yes, Maimu is my real name, given me by my dad. And the reason you haven't heard it in America...well I am not an American :) I’m an Estonian. Thats why I have a real strange name that most Americans can’t really pronounce. It’s “my-moo” LOL!
Okay. I will have to study more about how the sewing machine works so I can buy the right one for heavy duty stuff.
ReplyDeleteI guess you must be someone's aunt from the other part of your name?
For heavy duty, the inside as well the outside should be metal. I got Janome 1600P-QC this year for all my sewing and I love it! Juki and Brother also have semi pro machines.
DeleteMaybe look into vintage machines. US should have an awesome selection!
And yes, I am someones aunt. But I got the nickname "aunty Maimu" way before my brother became a dad. Infact my friends youngest sister started me calling that when we first met. She was at a tender age of 16...I was...wait.... 20 something LOL! And ever since most of my friends here call me "aunty Maimu"
Yes I like the idea of a vintage machine. I was looking at some of them on Ebay. I am sort of stuck in the past anyway -- Sometimes I think I was born in the wrong decade.
ReplyDeleteNow I finally understand your name!
-Matt
Yes, I would love to have a Kenmore 1410, but sadly it wont work here because the voltage is different... ouh and the shipping will cost like 600$
Delete